Decorate Ahead! Stabilized Whipped Cream That Holds Shape for Days
Imagine piping exquisite swirls onto a celebratory cake, knowing they'll remain perfectly intact, light, and fluffy for days, not just hours. Or perhaps you're planning a grand dessert buffet, and the thought of last-minute frosting fills you with dread. Enter stabilized whipped cream – the baker's secret weapon for stress-free, picture-perfect desserts that truly last. If you've ever battled with deflating, watery whipped cream that wilts before your eyes, you're about to discover a game-changing technique that will revolutionize your baking.
Traditional whipped cream, while undeniably delicious, has a notorious Achilles' heel: its ephemeral nature. It's notorious for losing its airy volume, weeping liquid, and generally losing its decorative charm shortly after being piped. This is where the magic of stabilization comes in. By incorporating a simple, unflavored ingredient, you can transform delicate whipped cream into a robust, pipeable, and incredibly durable topping that maintains its structure and fluffy texture for up to two days in the refrigerator. No more decorating at the eleventh hour or fretting over your masterpiece collapsing!
Why Stabilized Whipped Cream is a Game-Changer for Bakers
For anyone who loves to bake and decorate, the benefits of using stabilized whipped cream are immense. It's more than just a minor improvement; it's a fundamental shift in how you can approach dessert preparation and presentation.
- Unmatched Longevity: The most significant advantage is its extended lifespan. While regular whipped cream might start to deflate and weep within a few hours, stabilized versions can hold their pristine shape and texture for up to 48 hours or even longer when properly refrigerated. This means you can decorate your cakes, cupcakes, or pies well in advance of an event, freeing up valuable time on the big day.
- Enhanced Structural Integrity: Ever tried to create intricate rosettes or delicate borders with regular whipped cream, only for them to sag? Stabilized whipped cream offers superior structural integrity. It's firm enough to hold sharp lines and intricate designs, making it perfect for elegant cake decorations, fillings for pastries like eclairs or cream puffs, and impressive dessert parfaits.
- Increased Heat Resistance: While no whipped cream is impervious to extreme heat, stabilized versions offer significantly better resistance to room temperature. This makes them a more reliable choice for desserts that might sit out for a couple of hours at a party or picnic, giving you a wider window before worrying about melting.
- Versatility in Application: Beyond just frosting, stabilized whipped cream excels as a filling, a topping for pies and tarts, or even as a sturdy base for fruit platters. Its ability to stand up to various applications makes it an incredibly versatile component in your baking repertoire.
This method truly empowers home bakers and professionals alike to tackle more ambitious projects without the usual time constraints or stress. It brings the joy back into decorating, allowing you to focus on creativity rather than urgency.
The Magic Ingredient: Unflavored Gelatin and How It Works
At the heart of this enduring dessert topping is a simple, often misunderstood ingredient: unflavored gelatin. While the idea of adding gelatin to whipped cream might sound unconventional to some, rest assured that it's a tasteless addition that makes all the difference, without altering the delicious flavor of your cream.
Understanding Gelatin's Role
Gelatin is a protein derived from collagen. When hydrated and then heated, it dissolves and forms a liquid. As it cools, this liquid sets into a gel. In the context of whipped cream, this gelling property creates a stable matrix around the air bubbles that are incorporated during whipping. This matrix prevents the air bubbles from collapsing and helps the fat and water components of the cream from separating, which are the primary reasons regular whipped cream deflates and becomes watery. It acts as an invisible scaffold, keeping your cream perfectly puffed and firm.
For the best results, always opt for unflavored gelatin. Brands like Knox are widely available in most grocery stores, typically found in the baking aisle near other gelling agents. It's crucial that it's unflavored to maintain the pure taste of your cream. Other stabilizers exist, like cornstarch, meringue powder, or cream of tartar, but gelatin remains a top choice for its reliability and excellent texture results.
Essential Ingredients for Stabilized Whipped Cream:
- Heavy Whipping Cream: This is the foundation. It must be cold – straight from the refrigerator. Cold cream whips faster and achieves greater volume and fluffiness. Look for cream with at least 36% milkfat.
- Powdered Sugar (Confectioners' Sugar): Sweetens the cream beautifully and dissolves easily, ensuring a smooth, non-grainy texture. Granulated sugar can make your whipped cream gritty.
- Pure Vanilla Extract: For that classic, aromatic flavor. Always use pure vanilla for the best taste, though other extracts can be used for flavor variations.
- Unflavored Gelatin: As discussed, this is your primary stabilizer.
- Cold Water: Used to "bloom" or hydrate the gelatin before dissolving it. This step is critical for preventing lumps.
With these few ingredients and a simple, precise technique, you'll be well on your way to mastering Master Stabilized Whipped Cream: Easy Guide for Fluffy, Long-Lasting Frosting.
Step-by-Step Guide to Perfect Stabilized Whipped Cream
Making stabilized whipped cream is surprisingly easy, adding just a couple of extra steps to your usual whipped cream routine. Precision in these steps is key to success.
1. Prepare Your Equipment
For the fluffiest, most stable whipped cream, temperature is your ally. Place your mixing bowl (preferably metal or glass) and whisk attachment (for a stand mixer) or beaters (for a hand mixer) in the freezer for 10-15 minutes before you begin. Chilled equipment helps the heavy cream whip up faster and hold its volume better.
2. Bloom the Gelatin
In a small, microwave-safe bowl, sprinkle the unflavored gelatin powder evenly over a few teaspoons of cold water. Do not stir it in. Let it sit undisturbed for 3 to 5 minutes. This crucial step, known as "blooming," allows the gelatin granules to fully absorb the water, preventing grainy lumps in your finished cream. You'll notice the gelatin change from a fine powder to a soft, wrinkly, gel-like mass.
3. Dissolve the Gelatin
Once bloomed, microwave the gelatin mixture for just 5-10 seconds. Remove it and stir until all the gelatin crystals have fully dissolved and the mixture is clear. If there are still undissolved bits, microwave for another 5 seconds and stir again. Be careful not to overheat it, as boiling gelatin can reduce its gelling power. Set the dissolved gelatin aside to cool slightly while you prepare the cream. It should be warm to the touch, but not hot.
4. Whip the Cream to Soft Peaks
In your chilled mixing bowl, combine the very cold heavy whipping cream, powdered sugar, and pure vanilla extract. Start mixing on low speed, then gradually increase to medium-high. Whip until the cream begins to thicken and soft peaks form. Soft peaks will hold their shape briefly when the whisk is lifted but will gently droop at the tip.
5. Incorporate the Cooled Gelatin
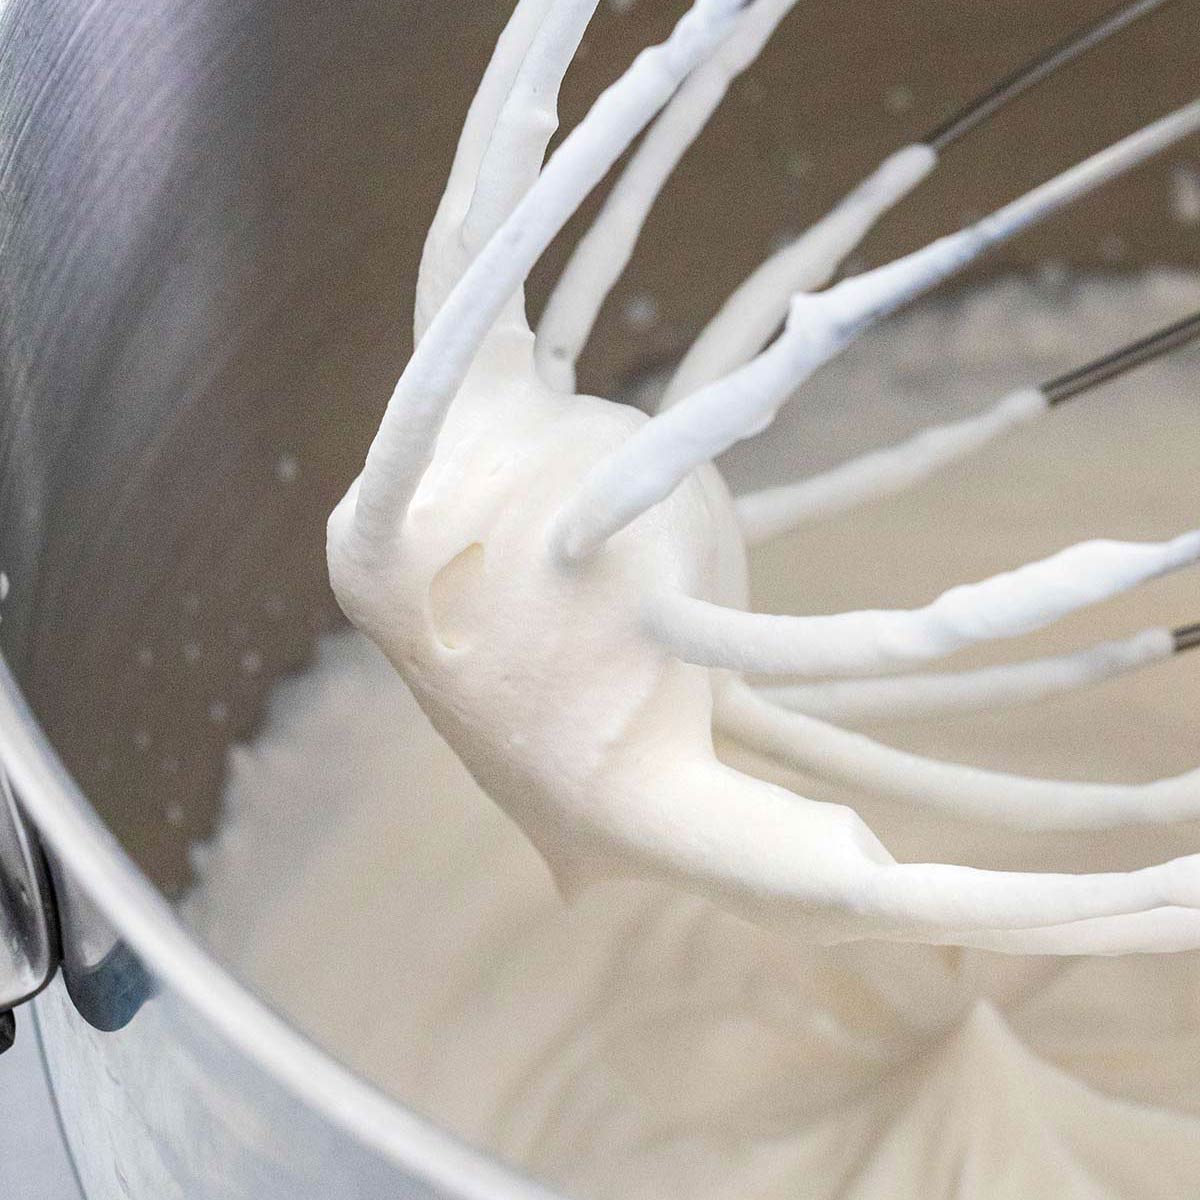
With the mixer running on medium speed, slowly and steadily pour the slightly cooled, dissolved gelatin mixture into the whipped cream. This slow addition ensures even distribution. Once all the gelatin is incorporated, increase the mixer speed to medium-high and continue to beat until stiff peaks form. Stiff peaks will stand straight up when the whisk is lifted and hold their shape firmly.
Important Note: This final whipping stage happens quickly after the gelatin is added. Watch carefully and stop mixing as soon as stiff peaks are achieved to avoid over-whipping, which can result in a grainy or curdled texture.
Tips for Success and Troubleshooting Common Issues
Achieving perfectly stabilized whipped cream is straightforward, but a few key tips and awareness of common pitfalls can elevate your results from good to magnificent. To Stop Deflating Whipped Cream: Stabilize with Gelatin for Perfect Desserts, pay close attention to these details.
Top Tips for Flawless Stabilized Whipped Cream:
- Temperature is Paramount: Always start with very cold heavy cream and chilled mixing equipment. The colder everything is, the faster and fluffier your cream will whip, and the more stable it will be. Ensure your dissolved gelatin has cooled to at least room temperature before adding it to the cream; hot gelatin can melt the fat in the cream, causing it to break.
- Don't Skip Blooming: The 3-5 minutes for gelatin to bloom in cold water is non-negotiable. Rushing this step will almost certainly lead to undissolved gelatin bits in your final product, resulting in an unpleasant grainy texture.
- Gentle Heat for Dissolving: When heating the bloomed gelatin, use short bursts in the microwave (5-10 seconds at a time) and stir thoroughly. Overheating gelatin can weaken its gelling power, making your whipped cream less stable. It should be clear and liquid, without any visible granules.
- Add Slowly, Whip Swiftly: Pour the cooled, dissolved gelatin into the soft-peak whipped cream in a slow, steady stream while the mixer is running. This ensures even distribution. Once added, whip to stiff peaks promptly, but avoid over-whipping, which can turn your beautiful cream into a grainy mess or even butter.
- Quality Ingredients Matter: Use a good quality heavy cream (full-fat is essential, usually 36% milkfat or higher) and pure vanilla extract for the best flavor. Powdered sugar is preferred over granulated to avoid a gritty texture.
Troubleshooting Common Issues:
- My whipped cream isn't thickening:
- Is your heavy cream cold enough?
- Are your bowl and beaters chilled?
- Is your cream past its expiration date?
- Did you accidentally use half-and-half or light cream instead of heavy cream?
- I have lumps of gelatin in my cream:
- The gelatin was not properly bloomed or fully dissolved before adding.
- The dissolved gelatin was added too quickly or wasn't stirred in sufficiently.
- My whipped cream is grainy or looks curdled:
- You likely over-whipped it. Stop immediately as soon as stiff peaks form.
- The gelatin mixture was too hot when added, causing the cream to break.
- My whipped cream isn't holding its shape for days:
- Not enough gelatin was used (check your measurements carefully).
- The gelatin's gelling power was compromised by overheating during dissolution.
- The cream was under-whipped; it didn't reach stiff peaks.
By following these guidelines, you'll consistently create beautifully stable whipped cream that will impress everyone.
Beyond the Basics: Flavor Variations and Creative Uses
Once you've mastered the art of making basic stabilized whipped cream, a world of culinary creativity opens up. This robust topping is perfect for far more than just a simple dollop!
Flavorful Enhancements:
While classic vanilla is always a winner, don't hesitate to experiment with different flavor profiles:
- Chocolate Whipped Cream: Sift 1-2 tablespoons of unsweetened cocoa powder along with the powdered sugar before whipping. For a richer chocolate flavor, you can also melt a small amount of good quality dark chocolate, let it cool completely, and gently fold it into the soft-peak cream before adding the gelatin.
- Citrus Zest: Add finely grated lemon, orange, or lime zest for a bright, refreshing note. Incorporate it with the powdered sugar.
- Coffee or Espresso: Mix 1-2 teaspoons of instant espresso powder or very strong, cooled coffee into the heavy cream before whipping for a delightful coffee-flavored cream.
- Nutty Flavors: A few drops of almond extract or hazelnut extract can add a sophisticated touch.
- Fruit Purees: For a natural fruit flavor, gently fold in a few tablespoons of thick, strained fruit puree (like raspberry or strawberry) after the cream has reached stiff peaks. Be mindful that adding too much liquid could slightly reduce its stability, so add sparingly.
- Spiced Whipped Cream: A pinch of cinnamon, nutmeg, or pumpkin spice can be wonderful, especially for autumnal desserts.
Creative Culinary Applications:
The versatility of stabilized whipped cream extends to countless desserts:
- Elegant Cake and Cupcake Frosting: Its primary and most popular use. Create intricate piping designs that truly last.
- Pie and Tart Toppings: A beautiful, stable topping for fruit pies, chocolate silk pies, or Key lime tarts. It won't melt into a puddle at room temperature.
- Pastry Fillings: Perfect for filling éclairs, cream puffs, or delicate choux pastry creations, as it holds its shape inside the pastry without seeping out.
- Layered Desserts: Ideal for trifles, parfaits, and verrines, where its distinct layers remain defined and beautiful.
- Stuffed French Toast or Waffles: Elevate a breakfast or brunch dish with a fancy dollop that won't disappear on a warm plate.
- Garnish for Hot Beverages: A swirl atop hot chocolate or a gourmet coffee will last longer without sinking or melting instantly.
With stabilized whipped cream, your dessert creations are limited only by your imagination. Enjoy the confidence of knowing your beautiful garnishes will remain flawless, long after they're made.
Conclusion
The days of deflating, weeping whipped cream are officially over. By embracing the simple technique of stabilizing whipped cream with unflavored gelatin, you unlock a new realm of possibilities in your baking and dessert decorating. This method empowers you to prepare ahead, create stunning, intricate designs, and serve desserts that remain picture-perfect and delicious for days. It's a fundamental skill that every home baker can easily master, transforming everyday treats into extraordinary culinary delights. So, gather your ingredients, chill your bowl, and get ready to decorate ahead with confidence and flair. Your desserts (and your guests!) will thank you for it.
